Thursday, October 31, 2019

Pillow Boxes

Here are a couple of kraft pillow boxes decorated for Halloween. 


I used the roller in black ink on the first box and gorgeous grape ink on the second.  These boxes are kraft colored so it really helps to go with the theme coloring them.
The wicked die cut is cut from silver glossy paper on both boxes.  I ink sponged granny apple green ink on the first one.
Hope you like,any questions, let me know.  These are both from the Holiday Catalog samples.
May you and yours have a safe and Happy Halloween!

Until next time,
Inky Hug,
Alicia

Wednesday, October 30, 2019

Wicked Invitations

Here's another cute idea for an invitation to a Halloween party.  It has been awhile since I have been to a party, but the ones I used to attend were always so much fun.  I dressed up as "Elvira" and had fun doing different versions of her through the years.

Anyways, here is the invite, which is embossed with the stylish scroll embossing folder on black glossy paper. 
The wicked and spider die cuts were cut from Gorgeous Grape card stock.  It is always fun to see
what can be made with stamps and die cuts.

Until next time,
Inky Hugs,
Alicia

Tuesday, October 29, 2019

Wonderly Wicked

I actually only bought one Halloween set in the Holiday catalog this year, the Wonderfully Wicked stamp set and dies.  I just loved the wicked die cut. Since I have been busy with cards for my swaps at On Stage, I only made four things with it.  This is the first one:
Isn't it cute?? Getting some treats in that would be fun!  This is copied directly from the catalog.  It was easy to put together with the mini pizza box.  The paper for the background is from the Monster Bash collection.  The wicked die cut is from white glitter paper colored with Gorgeous Grape ink. The cat is from the stamp set. Hope you enjoyed. 

Until next time,
Inky Hugs,
Alicia

Monday, October 28, 2019

Halloween Decor

Hi all!  I'm back.......

Well, it is that time of year again for the ghosts and goblins to come out!  I have been fairly busy on the craft front getting ready for Halloween, Thanksgiving, Christmas and Stampin Up OnStage event here in November.  I swap cards with other demos and it is a chance to meet them and get all kinds of cards and gifts.

Well back to the heading..the Decor.  Since we don't live in a house that is easy to trick or treat at, I just decorate outside with Halloween and Fall together.  After Halloween, I take all the "Halloweeny" stuff down and leave the Fall decor.  Inside I decorate a table in our foyer for Halloween.  Most everything on the table is handmade by me through the years.  Love looking back at what I was "into" from year to year.

Here is a picture o this year's display:

  Will be back tomorrow with a few of this year's Halloween creations for you.  Until then,
Inky Hugs,
Alicia

Monday, September 30, 2019

Shabby Chic

I did another project with the Needlepoint Nook Suite.  This includes a  a 8x8 card box and 4 matching cards.  The DSP is so pretty and of course, it is double sided so you can use it so many different ways.  I made the box. There are many videos on U Tube on how to make one so I wont go into it here.  The cards are all using the same basic colors and designs.  There is a die cut that embosses to look like embroidery stitches that I love. I used it on all the pieces.  The colors used in the card stock and ink were-very vanilla ,rich razzleberry, powder pink, blushing bride, old olive and granny apple green. I love the saying in this set.  It says:  People like you make the world a better place.  Thank you all for looking.


Well, that pretty much completes what I did crafty over the summer.  Getting ready for Fall and Halloween.  Hope to show you some of those creations soon.  Take care.
Until next time ,
Inky Hugs,
Alicia

Sunday, September 29, 2019

Needlepoint Nooke Suite

I almost didn't order this suite but the more I saw things that were made with it, the more I knew I was going to.  It reminded me of when I was a young girl, my Aunt would do different types of embroidery and she would bring things for me to do it with her.  I still have one of the pieces that I did and it is still in the hoop!

So the cards I made go into the Acetate Card Box.  I used the same colors and elements on all the cards. I used a Poppy Parade stitched piece of DSP for the cover on the box. The flowers on all the pieces are stamped with poppy parade and crushed curry.  The leaves are old olive ink then die cut and attached with dimensionals. The cards use the basic same color scheme.  Turned out cute,right?
This idea came from one of my favorite blogs, Stampin Hoot.


 Until next time,
Inky Hugs,
Alicia

Friday, September 27, 2019

Magnolia 3D Embossing Folder

Told ya!  I couldn't quite get enough of the Magnolia Suite.  Today is the last of what I have done with this suite this summer.  This was a fun one to do.  This embossing folder is sooo pretty on its own.  Emboss anything, any color card stock or foil paper.  It just stands alone in artistic beauty.  But I added some color with the Stampin Blends to give it some more demension.

The card base is Petal Pink card stock with a piece of old olive card stock underneath the piece of embossed white card stock.  I then lightly colored the petals with petal pink stampin blends.  The leaves are colored with old olive.  I added some shine with the shimmer pen.


Enjoy!
Until next time,
Inky Hugs,
Alicia

Thursday, September 26, 2019

Thinking of you

Ever need a card to send someone just to let them know they are in your thoughts?  The following card is just right for that.


Again the Magnolia Suite makes is easy peasy.  This card uses the die cut buds out of the DSP along with vellum card stock and a petal pink card base.  I black embossed the sentiment on the vellum.
The pink paper under the vellum is the reverse side of one of the papers.

Sorry about the photo but camera is not fixed yet and had to use another one.  Hope you can see it well enough to see how really pretty it is.

Until next time,
Inky Hugs,
Alicia

Tuesday, September 24, 2019

Magnolia Lane

As I shared with you yesterday, I really like this suite from Stampin Up.  One of the reasons, is that you can die cut the flower buds out of the beautiful DSP.  That is exactly what I did in the following card.  I used the DSP as the background in the die cut frame and then attached the buds with dimensions to give them interest.

All in all, a pretty easy card to create.  The picture really doesn't do it justice.

See you tomorrow.
Until then,
 Inky Hugs,
Alicia

Monday, September 23, 2019

The Magnolias Are Coming

This week I am focusing on the beautiful Magnolia Suite in the Annual Caddie.  Everything in this suite is really pretty. I started making cards and just couldn't quit once I started as you will see this week.

The first one was created with basic black card stock.  I then used the stitched frames die cut to make the frame out of Petal Pink card stock .I stamped the large Magnolia stamp and die cut it. Then I colored it some petal pink ink.  To complete the flowers, I die cut 2 buds from the corresponding DSP.
Once that was finished, I assembled it all together to create the card below.
  Until next time,
Inky Hugs,
Alicia

Saturday, September 21, 2019

Sailing...

It is well known for people who know me, that I love the ocean and the beach and lighthouses and pretty much anything associated with them.I  feel so fortunate that I have been able to cruise on the ocean many times in many different ways.  Each time I always feel the freedom of the wide open water.  One of my very favorite was a barefoot cruise on a sailboat in the western Caribbean many years ago.

Back to land now.  The following card reminds me of the outer banks in North Carolina and all the wonderful lighthouses there.  If you haven't been and ever have a chance, don't miss them.
This next one is from the annual caddie. If you like sailing, doesn't this just make you want to get on a sailboat now?
Hope you have liked my sailing series.  I have a feeling I will be creating with this set again but hope to have better pictures.

Until next time,
Inky Hugs,
Alicia

Friday, September 20, 2019

"Let Hope Be Your Anchor-Part 2"

Continuing with the theme from yesterday, I made a coupe of cards with the saying.  Both are a case, but I really like the techniques involved so I did them pretty much as I saw them.  The first one is a case from The Crafty Carrot Collective.
 The second one involved lightly stamping on Mossy Meadow cardstock and then adding some texture with the subtle embossing folder.  I stamped the lighthouse on vellum card stock in versa mark ink and embossed with white embossing powder.  To get the texture on the circle, I used one of the laser cut cards from the Memories and More package and dry embossed with my die cutting machine.  Pretty cool trick.  Then I die cut a few seaweeds out of the peacock suite vellum cardstock.
Thanks to Tanya Rees for the inspiration.
 Been having some camera issues so these are not the best photos but you get the drift,right?
Hope you like.
Until next time,
Inky Hugs,
Alicia

Wednesday, September 18, 2019

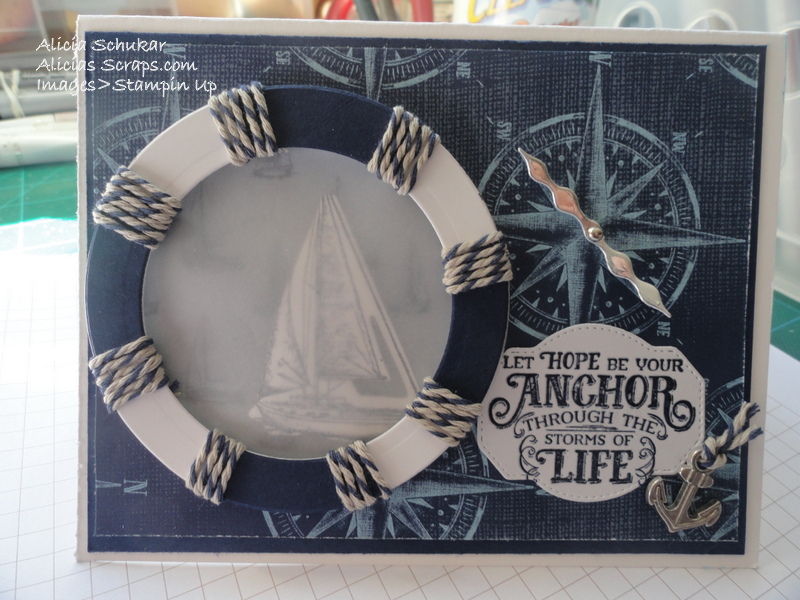
"Let Hope Be Your Anchor through the Storms"

I just love this saying in the stamp set Sailing Home from Stampin Up.  When I made the card I am showing you today, it reminded me that there is always hope.  Never say Never.  You never know what you can accomplish unless you try.

The card I made today has the saying on it with a port hole looking out to sea with the beautiful Designer Series paper in this suite.  All supplies are Stampin Up. 

Let me know if any questions about how it is made.

Happy Sailing!!!

Until next Time,
Inky Hugs,
Alicia
Tuesday, September 17, 2019

Sailing Home

The card that I am going to share with today is called a twisted pop-up card.  It is a little complicated to make but there are several u-tube how tos out there if you want to try it.  It is fun to send to someone special.
The front of the card looks like any other card and it does fit in a normal envelope.  I used a gorgeous laser piece from the Sailing Home Memories and More pack.  Super simple simply secure the stencil to paper you choose and there you go!
I love how these papers and stamps work so well together.  I used night of navy,mossy meadow,real red,crumb cake and balmy blue card stock and ink for the inside.
Here you can see all the stamps and die cuts I used for the inside of the card. I did use the water from the High Tide set on the first and last card.  Isn't this a fun card!
Until next time,
Inky Hugs,
Alicia

Sunday, September 15, 2019

What Happened??

Somehow, someway summer is still hanging on where I live.  Whew and it is HOT!!  Hoping for some cooler days in the coming weeks.  Don't get me wrong, I am definitely a beach person, but do like the crispness of the autumn breeze.  With all that said, I have been busy creating in the midst of heat, sun and surf!!!
I really enjoyed creating with the Stampin Up set, Free as a Bird.  It is the most popular stamp set in the new annual caddie.  All supplies used are Stampin Up and inks used to color the birds are pretty much all the same too.  I did use my Brother cut and scan to cut out the bird images to give some dimension to the cards. Hope you like:


 Hope you like..
Until next time,
Inky Hugs,
Alicia

Tuesday, June 25, 2019

Pumpkin Pie??

I know we are in the midst of summer but I always love to see the fall colors in the leaves appear.  Don't get me wrong, I love summer and the beach but also really like fall's flowers which are the beautiful colors in the leaves that remind us of the fall. My husband and I always take a "Leaf Peeping" trip to North Georgia, where the leaves are beautiful.  My camera gets a workout that day!

So to the card, I cased it from Pinterest and Elizabeth Price.  The colors are Crushed Curry and Pumpkin Pie ink all over the front panel of Shimmery card stock. Once it was dry, I spritzed with frost white shimmer paint to give it a really shimmery glow.  Then I stamped the skeleton leaves in a random layout.

I then stamped the Thinking of you on a die cut and added Dazzling Diamonds Glitter for more sparkle.  What ya think?  I love the sparkle as it gives it a really interesting look.  I then added other little embellies to give it even more interest.  Hope you like.

 
 Now back to summer...
Inky Hugs,
Alicia

Sunday, June 23, 2019

Sweet Wishes

These are some quick tags that I made with the Hello Cup Cake stamp set.  Like to have some on hand as you never know when you might need one.

I stamped and die cut the Hello Cupcake images in:  Bermuda Bay,Mango Melody and Flirty Flamingo. The cake stand is die cut with Bermuda Bay card stock and the dome is cut out of an Acetate Window Sheet.  I layered these onto white thick card stock tag with some Daffodil Delight Gingham paper on the bottom. .  I wanted the dome to extend above the top of the tag so I could make a hole to tie some twine in to attach to a gift. 

These are quick and simple to make. You could make them in very little time to add that special something to a gift.


Until next time,
Inky Hugs,
Alicia

Thursday, June 20, 2019

Hello Cupcake!

With Hello Cup Cake stamp set I added the Lovely Lipstick/Grapefruit Grove Foil Paper cut with the Rectangle Stitched dies, Well Written dies and a few ink pads, shimmering embossing paste, sequins and mini candles.  I put the paste on the "ice cream" part of the stamp and added some fun sequins.

This is one of my favorite cards that I have made as it just says lets have some fun on my birthday!
All supplies are Stampin Up.

Hope you enjoy!

Until next time,
Inky Hugs,
Alicia

Monday, June 17, 2019

Happy Birthday!

One of my favorite cards to make is a birthday card.  So I found this one on one of my favorite creators blog, Seeing Ink Stamps, and here is my CASE.

This card came together fairly quickly even though it looks more complicated.  A piece of Lemon Lime Twist gingham paper was attached to a Gold Foil Edged Card.  Using the Well Written die cuts, I die cut the happy with Lemon Lime Twist and the birthday with Sparkle Glimmer Paper. The birthday is sponged with black ink.  A few other products were Swirly Scribbles Die Cut, Silver Mini Sequin Trim and the Corrugated Dynamic TIEF.

It is a fun birthday card!  Hope you enjoy!

Until next time,
Inky Hugs,
Alicia

Friday, June 14, 2019

Should we water them?

Hi all! I am back with another card made with the Climbing Orchids stamp set.  As I told you in my last post about these stamps, it is easy to want to make more so I found this on Pinterest and here is what I have.
These are made with watercolor paper and the paper really does all the work.  In case you want to try these are the how tos:

Stamp the leaf and large flower and flower center with Lemon Lime Twist on watercolor paper.  With a damp(not loaded ) brush go over each image with a light touch to spread the color.  While the flower is still damp add some Crushed Curry by just touching the center of the flower and let the color bloom.  Now introduce Sweet Sugar Plum ink to center and let that color bloom.  Let them all dry naturally.  The leaves are done the same way with Lemon Lime Twist ink. I wanted to add some sparkle so I used the clear Wink of Stella on each.

I attached the flowers to white card stock that is attached to Lemon Lime Twist card stock for front of card.  Those were attached to a white card stock card.  All supplies are Stampin Up.

Until next time,
Inky Hugs,
Alicia