Saturday, December 24, 2011

Wishing all a very Merry Christmas and a Happy New Year!  This is my last post for the year.  Hope you like.  It is one of the cute little kraft boxes from Stampin Up that I decorated.  Had a lot of fun making this one.  Made several similar for presents. Until the next time,
Hugs,
Alicia

Saturday, November 26, 2011

Give Thanks Cards and Holder

I have so many things to be grateful for that I didn't just make one card!  I make several with a card holder to boot!!!  Love this stamp set, Gently Falling and the DSP, Spice Cake from StampinUp.  Now that we have had the turkey and Black Friday is behind us, I guess I need to retire this and start on the Santa stuff.  Can't believe that Christmas is so close.  Hope you had a great Thanksgiving and if you did shop on Black Friday, that you got all the "good" stuff.  Until next time,
Hugs,
Alicia


Thursday, November 24, 2011

Rosette Fall Wreath

Really wanted to try making the rosette wreath, so finally had time to to it!  Like the final results.  It was not really hard to make just time consuming to make all the rosettes.  Then had to decide how to use them on the wreath.  I stamped some leaves from the Stampin Up stamp set, Gently Falling, and added them for some interest on the rosettes.  Hope you like, I have some other Fall offerings that I will post, even a couple of Happy Thanksgiving cards!  I guess it is better late than never, right?  Hope you and yours have a safe and Happy Thanksgiving!  Until next time,
Hugs,
Alicia 

Wednesday, November 2, 2011

Dreary Midnight

I tried going for the "vintage" Halloween card on this one.  I don't know if I truly pulled it off, but it's close.  Most all of the ink was embossed.  I started with the Midnight Musing Jumbo wheel ( which I have remounted and used it with acrylic blocks) and embossed it with clear powder on Basic Gray CS, then rubbed BBlack ink over the top.  Luck Limeade is used for the mating.  TTango was embossed with the Spider Web embossing folder and the BIG SHOT (love this machine!), rubbed it with BBlack ink.  The frame stamp from the Creative Elements set was embossed with BBlack embossing powder on BBlack CS.  Dark and Dreary candelabra was embossed with white powder on BBlack CS.  I took one of the "designer frames" embossing folder and pressed it with the Big Shot and rubbed it with BBlack ink.  The saying is from Tiny Tiny Wishes set.  I added some of the Raven lace ribbon (retired) and pearls to finish it.  Viola!!  My version of "Halloween Vintage"!  Hope you enjoy.  Just one more Halloween posting and I promise no more until next year.  Hehehehe.......
Hugs,
Alicia

Tuesday, November 1, 2011

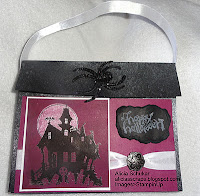
Happy Haunting Card Case w/Cards


Ok, I know that Halloween is over for this year, but I just couldn't stop making Halloween cards so I have some more to share today and two more after that.  I love making card holders/cases/purses to put cards in.  They are perfect for a quick gift when you may need one!  I really love this stamp set (can't you tell!!) with the Haunting House so I made a cute little purse/case and two cards that you can put in it.  I have done quite a bit of embossing for Halloween along with the bling and really love the effect it has on the cards.  Well, until next time,
Hugs
Alicia   

Monday, October 31, 2011

Happy Haunting Candy Tree


Had so much fun making this tree full of Halloween treats! It is one of those projects that just comes together when you start working on it. Sorry the pictures really don't do it justice (note to self, must get a better way to photo my projects!) Anyway, I made these cute little candy purses out of that wonderful slivery shiny Glimmer paper out of the Holiday Mini Caddie. It is still available and you won't be sorry you got it. It is really top notch! Then I used several different types of Designer Series Paper, both new and retired, and couldn't stop with putting the dazzling details all over them! Sooo,I hope you like my creation and that you have a Spooky, Fabulous Halloween!!!!! Until Next time,
Hugs,
Alicia
Posted by Picasa

Saturday, October 29, 2011

Wicked Witch's Hat and Shoe


Saw this witch's hat in a big box store and knew that I had to do something with it. Well, what do you think?? I am really liking it. The shoe was just too cute not to pair with the hat. I painted the plain hat with black paint then sprayed some shimmer paint on it, added some black diamonds along with the material and more diamonds. The shoe was a pattern that I found on the internet. Used some retired DSP and added some more diamonds!! Can't seem to get away from all the bling this Halloween. Guess I will have to continue for Christmas with it also! Hope you enjoy, it was a lot of fun to create! Until next time,
Hugs,
Alicia

Friday, October 28, 2011

Sparkliing Spooky


This card cam together very quickly with the help of My Digital Studio. Printed the skeleton from the Crypt stamp set in MDS on glossy paper. Then stamped Spooky on it and added diamonds and sliver glimmer Viola!. Quick card and lots of fun! Until next time,
Hugs
Alicia

Wednesday, October 26, 2011

Halloween Lollies/Wand Sticks


Here we are a day 8 already!! Time is passing very quickly. Today I am sharing a cute (well, I kind of think it is!!) Lolly/Wand centerpiece. I have really taken a liking to making lollies with the new Stampin Up tool, Simply Scorced. If you would like directions for this, leave me a message and I will be happy to help you with it. Also, if you would like to order one of the Simply Scorced tools,just click on my store at the top of the page. Another cool thing that I did was use My Digital Studio to make the centers with the bat and mummy along with the dazzling details and Silver Shimmer paper.  Hope you enjoy.  Until next time, Hugs
Alicia 

Tuesday, October 25, 2011

Happy Halloween Card Case with 4 Cards


Here are my offerings for days 4, 5, 6, and 7 for my 13 days of Halloween. I am combing them since life was busy for me for the last several days as I watched and celebrated a young man's life cut short by the war in Afghan. He was a very dear friend of my two grandsons, one of whom is getting ready to go back to fight there shortly himself. I am now back on track and hope you enjoy the above shots. Lots of work and detail in the card case itself. I have made several of these cases from a pattern that I have had for quite a while. It is very adaptable for all seasons and reasons. I really love all the Halloween stamps that Stampin Up has this year. So have used several along with embossing folders and masking and of course, bling! Let me know if you have any questions about them and until next time, Hugs
Alicia
Posted by Picasa

Thursday, October 20, 2011

Skelton Coffin


Here is day 2 of my 13 days of Halloween offerings. This was a fun project to make. Found this wooden coffin on sale at a big box store, so I decided to try my hand doing something with it. I am pleased with the result. I painted the coffin with black paint. Then covered it with some retired Designer Series Paper. The figures were printed from MDS (My Digital Studio) and cut out and glued on the box. This is a quick and easy gift box to make. Just add some chocolate nuggets inside the coffin and there you go!! Hope you like. Until next time, Hugs
Alicia
Posted by Picasa

Wednesday, October 19, 2011

Spooky Box of Tags


This is my first offering in my 13 days of Halloween. Cut the box out of the Fancy Favor Box Die Cut. Then I cut an opening in the front so that you could see the tags. Next I cut several tags out of another die cut with the Newspring DSP. I then stamped the images from the stamp sets, Wicked Cool, House of Haunts, and Dark and Dreary in Versa Mark Ink and used black embossing powder to give them each a shine. Of course, I had to add some bling!! Got lots more to share. Until next time, Hugs
Alicia
Posted by Picasa

Tuesday, October 11, 2011

Want to Get a Free Big Shot???

Free Big Shot Offer


An offer to DIE for!
If you've been looking for an opportunity to do what you love, while getting a 20% discount on your favorite products, now is the perfect time! During October, you'll get a FREE Big Shot when you join the Stampin' Up! family as a demonstrator.*
Use the Big Shot die-cutting machine and Stampin' Up!'s exclusive dies**  to create uniquely beautiful projects in a flash.
In addition, the new-demonstrator Starter Kit--a steal at just $175--contains over $345 worth of stamp sets, card stock, ink, accessories, and business supplies-everything you need to start your new business.
There are so many benefits of being a Stampin' Up! demonstrator, including
  • A 20 percent product discount!
  • A free monthly issue of Stampin' Up!'s demonstrator-only magazine, Stampin' Success!
  • Sneak peeks at brand-new products!
  • Invitations to exclusive Stampin' Up! events!
  • Regular get-togethers to stamp!
  • Free access to an online community of 30,000+ crafters/stampers and creative artists, as well as 160,000+ project samples!
  • Plus, access to an exclusive video and training for your new Big Shot!
  • Contact me and let's get started today!!  This is a wonderful opportunity for you.  If you already have a Big Shot, you can choose $100.00 in merchandise of your choice.  WOO  HOO!!!!    Don't miss this chance!!!! 

Thursday, August 18, 2011

Pretty Postage


Well, I must tell you that I am very proud of this card! I love the way it turned out. I got the idea from some of my many "wanderings" through the internet and magazines. I was going for vintage and I do believe that I accomplished the look! Lot of embellies on this one! AND one of my very favorite new DSP is the Mocha Morning! If you haven't see this, you need to! It is sooo very pretty. For a look, just click on my store button on the side and check it out in the new IB&C! You won't regret it, I promise!
Until next time.
Hugs,
Alicia
Posted by Picasa

Wednesday, August 17, 2011

Treat Yourself as your own best company!


I really like the saying on this card! It makes you realize that you really should treat yourself special. Cause you are! Anyway, I find that I am really liking the "vintage or antique" look on my cards and scrapbook pages so this really spoke to me when I saw this card on the cover of the new caddie. There are a lot of extras on this card that my camera, unfortunately, did not pick up. Just to mention, there is Shimmer Smooch Spray on the flower which really gives it a shine. The new Designer Frames textured Impressions Embossing Folder is to die for. There is a learning curve for using it but really is a great addition! Thanks for looking and hope you enjoy!
Until next time
Hugs,
Alicia
Posted by Picasa

Tuesday, August 16, 2011

Best of Everything #2


This is the second card that I made with the Best of Everything stamp set out of the new IB&C from Stampin Up. I LOVE all the new In Colors for this year and next, which include Calypso Coral, Lucky Limeade, Pool Party, Wisteria Wonder, Island Indigo. Don't u just love the names? Makes me want to go to the beach!! Anyway, this card was made to help showcase the new In Colors. I cased this from the cover of our demonstrator magazine that you get. Let me know if you are interested in becoming a demonstrator. There are a lot of perks! Hope you enjoy and until next time,
Hugs,
Alicia
Posted by Picasa

Monday, August 15, 2011

Best of Everything #1


This card is the first of two that I made with a new stamp the new IB&C of StampinUp. I really like this stamp set, The Best of Everything. It has several images that can be used for different cards. Hope you like my card share for today. As the card says, "all i want is the best of everything for you"! Until next time,
Hugs,
Alicia
Posted by Picasa

Sunday, August 14, 2011

Amour


A quick card that I made using the Artistic Etchings stamp set. Still on my kick of vintage or antique so was just playing with this. Hope you like. Maybe one day I will make it to Paris.....:) Until next time,
Hugs,
Alicia

Posted by Picasa

Summer Fun

Isn't this just the "cutest"?I had a lot of fun making this bag full of goodies for the beach. The stamp set is Sunny Fun from the Summer Mini caddie that is getting ready to be history. So if you want to get this stamp, just click on the tab on the side of my blog for the caddie and order it from the summer mini. It is a fun set and as you can see has a lot of possibilities! I also used a favorite new in color of mine for the bag itself, Calypso Coral. I am really loving the new in colors. Visit my store online and check them out! Let me know if you have any questions. Until next time,
Hugs
Alicia
Posted by Picasa

Thursday, August 4, 2011

Awash with Flowers Card Case and Cards


This cardcase and set of cards looked at me for a long time before I finally broke down and put them all together.
Once I started with it, everything went together easily from instructions that I had purchased from Lee Ann Greoff. This will make a really cute hostess gift or just a gift in general. Hope you like. Butterflies are just the cutest, aren' t they?? Have a great day and until next time,
Hugs
Alicia
Stamps: Awash with Flowers, Well Scripted, Warm Words
Ink: Real Red, Old Olive
Other: Striped Ribbon, Red Gingham Ribbon,silver brads, large red brads, big shot, crop-o-dile, top note die cut, simple flower and beautiful wings embossilts, little leaves sizzlit and perfect polka dot embossing folder.
Posted by Picasa

Tuesday, August 2, 2011

"Crunching" Ribbon Flower

Love the way this turned out! I am sooo into "crunching" ribbon. I have caught myself doing this on almost all of my cards lately. If you haven't tried this, it should be a MUST do soon. I also really like the Build a Blossom stamp set along with the punch. The flower was made by stamping Cherry Cobbler in on Riding Hood Red cardstock, who knew it would be so good? Hope you like. Have a great day and do some stamping or something "crafty"! Until next time,
Hugs,
Alicia
Stamps: Build a Blossom
Ink: Cherry Cobbler, Basic Black
Paper: Crumb Cake, Riding Hood Red, Basic Black and Newsprint DSP
Pretties: 1 1/4 striped grosgrain ribbon, black, antique brads, black brads and modern label punch
Posted by Picasa

Sunday, June 26, 2011

Nature's Walk


Had a lot of fun making this card holder and cards.  I did the Tapestry Technique from Sage Kimble.  It has lots of steps but well worth it.  The card holder is a 8 1/2 x 11 piece of c/s that I scored in half and then cut one side of the fold diagonally to make folds to hold the cards.  I then got carried away with the front and added  the chain for the bird cage to hang from.    Anyway, hope you like it.  More to come shortly.  Got my mojo back and won't even tell you how many stamps sets that I have converted!!  Until next time,
                                                                  Hugs
                                                                 Alicia

Thursday, June 16, 2011

Beautiful Flowers!

Aren't these flowers just beautiful!!!  My DH brought these home to me from a yard that he takes care of.  (with permission of course!)  I just love beautiful flowers.  Thought I would share with you.

Wednesday, June 1, 2011

Today is Jun 1st!

Today is June 1st and you know what that means...the day we all find out which beloved stamp sets and accessories are being discontinued from the Stampin' Up! Idea Book & Catalog to make room for all the new products in the new catalog coming out on July 1st!


Discontinued Stamp Sets can be found HERE.


Discontinued Accessories can be found HERE and updated daily.

Discontinued Definitely Decorative products can be found HERE.


Discontinued stamp sets, Stampin' Up! will manufacture to fill demand. However, the accessories are first come first served, so don't delay in ordering! You can place your order with me - online HERE.

Thursday, May 5, 2011

Just taking a little break!

Hey Bloggers!  I know that I have been MIA for a couple of weeks.  Have been busy trying to unmount all my stamps to clear mount stamps!  Wow what a job this has turned out to be.  I don't think that I will get them all done this time but at least a good part of them.  I am beginning to be able to see all the stamps I have finally!  Even found some that I forgot about that I am just going to have to use.  So bear with me...I will return shortly with bigger and better projects!!
Until then
Hugs,
Alicia


Friday, April 22, 2011

Cupcake Tag share


It's official now! I love to do tags. I have been doing tags with other products for quite some time and dedcided since I like to do them so much I was going to incorporate them into my Stampin Up products. So this is the first try . This was a card that I cased from Dawn  Olchefske. I love the way it turned out on the tag. Let me know what you think. I have several more to share in the coming days. The countdown to be able to get this really cute stamp set is on, so don't miss it! You can order it from my store. Just click on the Stampin Up Logo on the right Hugs, Alicia
Supplies: Stamp: Create a Cupcake Ink: Melon Mambo, Pear Pizzazz Paper: Melon Mambo, Whisper White cardstock, DSP Accessories: Big Shot, Tastefully trim Die, Build a Cupcake Punch, 2 1/2 " Circle Punch, Pretty in Pink Striped Ribbon I really like how it turned out. Hope you like it too. Leave me a message if you like this and you can win it! Thanks for looking.
Posted by Picasa